# A Tutorial - OOP First in Three Parts
{cite: "Kathy Soul, 1980s"}
Practice makes better!
This three-part tutorial establishes the foundations of the key grammars around classes and objects. The first two work on a BankAccount and Bank class while the last part demonstrates the same concepts around the idea of rental cars and rental companies.
# Part 1
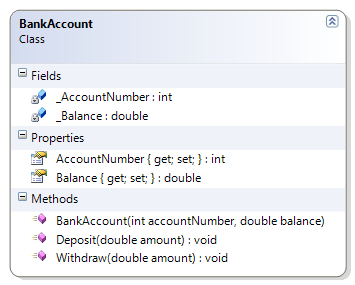
This tutorial will walk you through the steps to create a class and an object based on the following design. This first program will demonstrate a BankAccount class and the transfer of money from one bank account to another.
- Open up Visual Studio and create a new C# Console Application project. In that project, create a folder called "Tutorial".
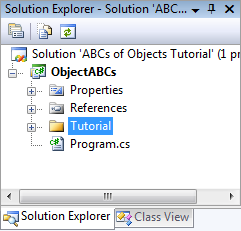
- Right-click on the Tutorial folder, and create a class called "BankAccount". Edit the BankAccount class so that it has the following code.
namespace ObjectABCs.Tutorial
{
    public class BankAccount
    {
        #region Fields (always private)
        private int _AccountNumber;
        private double _Balance;
        #endregion

        #region Properties
        public int AccountNumber
        {
            get { return _AccountNumber; }
            private set { _AccountNumber = value; }
        }

        public double Balance
        {
            get { return _Balance; }
            set { _Balance = value; }
        }
        #endregion

        public BankAccount(int accountNumber, double balance)
        {
            AccountNumber = accountNumber;
            Balance = balance;
        }

        public void Deposit(double amount)
        {
            Balance = Balance + amount;
        }

        public void Withdraw(double amount)
        {
            Balance = Balance - amount;
        }
    }
}
- Create another class inside the Tutorial folder, and name it "Bank". Edit the class so that it has the following code.
namespace ObjectABCs.Tutorial
{
    public class Bank
    {
        public static void Transfer(BankAccount fromAccount, BankAccount toAccount, double amount)
        {
            fromAccount.Withdraw(amount);
            toAccount.Deposit(amount);
        }
    }
}
- Create a driver class named "DemoDriver" and place it in the Tutorial folder. Edit the driver so that it has the following code.
using System;

namespace ObjectABCs.Tutorial
{
    public class DemoDriver
    {
        public static void Start()
        {
            BankAccount myAccount = new BankAccount(123546, 250.00);
            BankAccount storeAccount = new BankAccount(987654, 5473.28);

            DisplayAccount(myAccount, "My Account");
            DisplayAccount(storeAccount, "Store Account");

            Console.WriteLine("I am purchasing an item for $12.95");
            Bank.Transfer(myAccount, storeAccount, 12.95);
            DisplayAccount(myAccount, "My Account");
            DisplayAccount(storeAccount, "Store Account");
            Console.WriteLine("Purchase complete");
        } // end of Start() method

        private static void DisplayAccount(BankAccount account, string message)
        {
            Console.WriteLine(message);
            Console.WriteLine("-- Account Info --");
            Console.WriteLine("Acct. #: " + account.AccountNumber);
            Console.WriteLine("Balance: $ " + account.Balance);
            Console.WriteLine("-- ------------ --");
            Console.WriteLine();
        } // end of DisplayAccount() method
    }
}
- Open the Program.cs file and edit the Main() method to call the demo driver class.
using ObjectABCs.Tutorial;

namespace ObjectABCs
{
    class Program
    {
        static void Main(string[] args)
        {
            DemoDriver.Start();
        }
    }
}
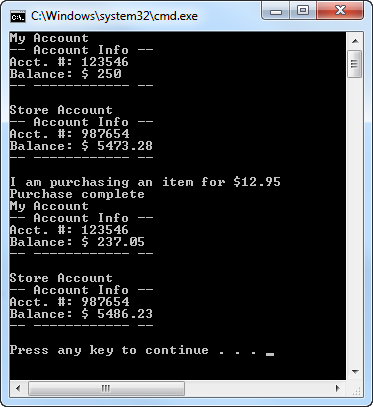
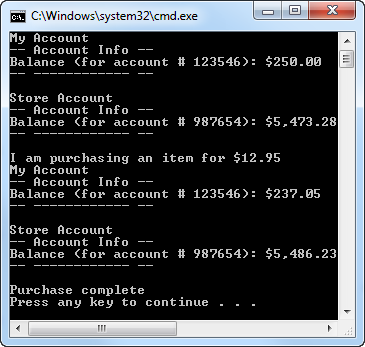
When you run the program, you should see the result as shown in the following screen-shot.
# Part 2
A big aspect of developing computer programs is the work of modifying existing code that you or others have written. In this part of the tutorial, we'll revisit the BankAccount and DemoDriver classes to add and take advantage of a new method on the BankAccount class: ToString().
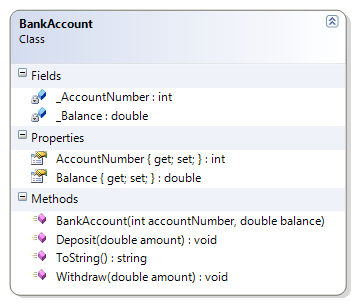
- Open the BankAccount class and modify it by adding the following ToString() method in the body of the class.
    public override string ToString()
    {
        string accountInfo = "Balance (for account # "
                            + AccountNumber.ToString()
                            + "): "
                            + string.Format("{0:C}", Balance);

        return accountInfo;
    }
- Open the DemoDriver class and modify the DisplayAccount() method to look like the following code.
    private static void DisplayAccount(BankAccount account, string message)
    {
        Console.WriteLine(message);
        Console.WriteLine("-- Account Info --");
        Console.WriteLine(account);
        Console.WriteLine("-- ------------ --");
        Console.WriteLine();
    } // end of DisplayAccount() method
# Part 3
Many times, properties act to provide transparent access to fields. (All of the examples so far have used Properties in this simplest way.) In C# version 3.0, a new syntax was introduced called auto-implemented properties which reduces the amount of code required to get the same effect as these transparent properties.
Auto-implemented properties do not have a field as a "backing store" and do not have bodies for the get and set methods. For example, the following code demonstrates an auto-implemented property.
public string ClientName { get; private set; }
This property has the exact same effect as the following, longer approach of using a property with a field in the background.
  private string _ClientName;
  public string ClientName
  {
      get { return _ClientName; }
      private set { _ClientName = value; }
  }
In this part of the tutorial, you will create classes that use auto-implemented properties, as well as regular properties.
- Open up Visual Studio and create a new C# Console Application project. In that project, create a folder called "Tutorial".

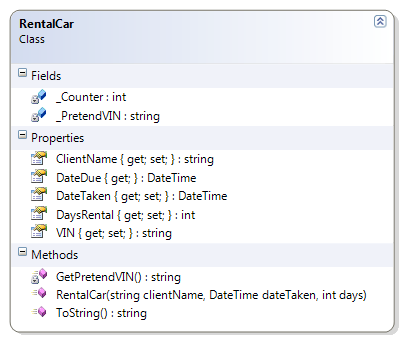
- Create a new class in the Tutorial folder called RentalCar. Edit the class so that it matches the following code.
using System; // needed for DateTime
namespace ObjectABCs.Tutorial
{
    public class RentalCar
    {
        public string VIN { get; private set; }
        public string ClientName { get; private set; }
        public DateTime DateTaken { get; private set; }
        public int DaysRental { get; set; }
        public DateTime DateDue
        {
            get
            {
                return DateTaken.AddDays(DaysRental);
            }
        }

        public RentalCar(string clientName, DateTime dateTaken, int days)
        {
            ClientName = clientName;
            DateTaken = dateTaken;
            DaysRental = days;
            // figure out the remaining values
            VIN = GetPretendVIN();
        }

        private static string _PretendVIN = "1ABC234DE567";
        private static int _Counter = 10;
        private static string GetPretendVIN()
        {
            string tempVIN = _PretendVIN + _Counter.ToString();
            _Counter = _Counter + 1;
            return tempVIN;
        }

        public override string ToString()
        {
            return VIN;
        }
    }
}
- Create another class named RentalCompany. Edit the code to match the following.
using System; // needed for DateTime
namespace ObjectABCs.Tutorial
{
    public class RentalCompany
    {
        public int CarCount { get; private set; }

        public RentalCompany(int carCount)
        {
            CarCount = carCount;
        }

        public RentalCar BookRental(string name, int days)
        {
            RentalCar car;
            car = new RentalCar(name, DateTime.Today, days);
            CarCount = CarCount - 1;
            return car;
        }

        public override string ToString()
        {
            return CarCount.ToString() + " cars available to rent.";
        }
    }
}
- Create a final class named DemoRentals. This will be the driver to use RentalCompany and RentalCar objects. Edit DemoRentals to match the following.
using System;

namespace ObjectABCs.Tutorial
{
    public class DemoRentals
    {
        public static void Start()
        {
            string name;
            int daysToRent;

            name = PromptName();
            daysToRent = PromptRentalTime();

            RentalCar rental;
            RentalCompany budget = new RentalCompany(5);

            rental = budget.BookRental(name, daysToRent);

            DisplayRentalInfo(rental);
        }

        private static string PromptName()
        {
            Console.Write("Enter name of person renting vehicle: ");
            string name = Console.ReadLine();
            return name;
        }

        private static int PromptRentalTime()
        {
            Console.Write("Enter number of days to rent: ");
            string daysAsText = Console.ReadLine();
            int days = Convert.ToInt32(daysAsText);
            return days;
        }

        private static void DisplayRentalInfo(RentalCar rental)
        {
            Console.WriteLine("Rental Info");
            Console.WriteLine("-----------");
            Console.WriteLine(rental);
            Console.WriteLine("Customer: " + rental.ClientName);
            Console.WriteLine("Due Date: " + rental.DateDue.ToShortDateString());
            Console.WriteLine();
        }
    }
}
- Lastly, modify the Main method in Program.cs to call the DemoRentals.Start() method.
using ObjectABCs.Tutorial;

namespace ObjectABCs
{
    class Program
    {
        static void Main(string[] args)
        {
            DemoRentals.Start();
        }
    }
}
- Run the program. You should get results similar to the following screenshot.
